Xeon E5 V3 Turbo Boost Unlock with S3TurboTool
Xeon E5 V3 Turbo Boost Unlock with S3TurboTool - step by step guide
You can download all required files and tools from my Microsoft One Drive: Miyconst Hardware / LGA 2011-3 / TBU 2023 Q4.
Remove the 06F2 CPU microcode
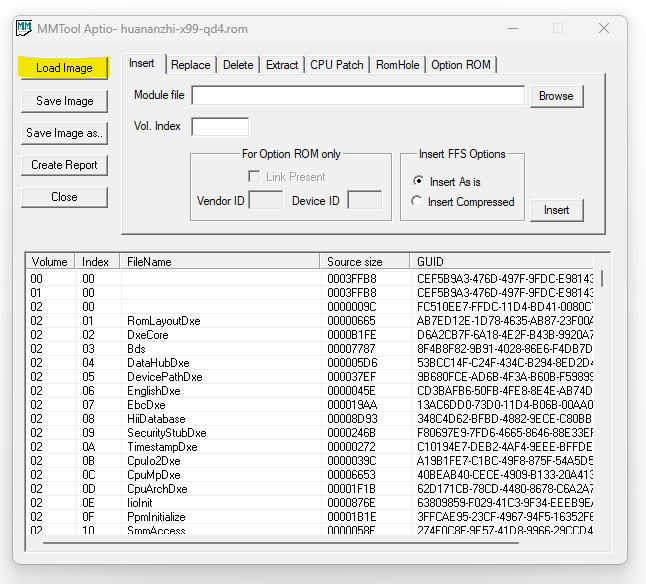
- Launch the
mmtool_a5.exeapplication. - Click the
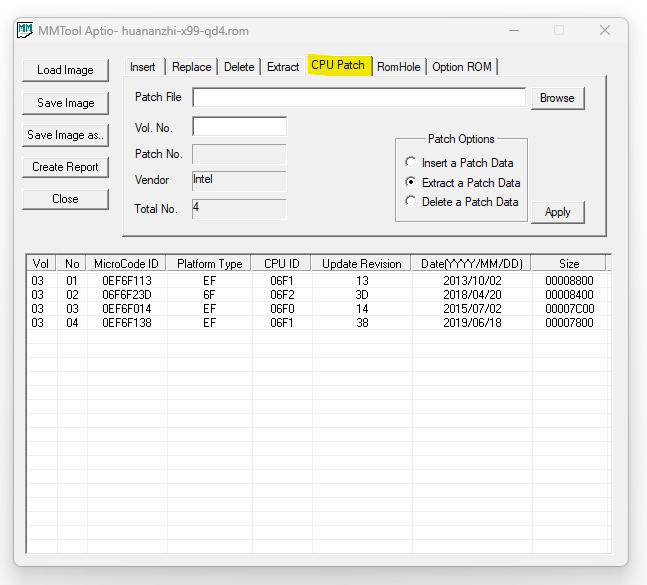
[Load Image]button and select your BIOS file. - Navigate to the
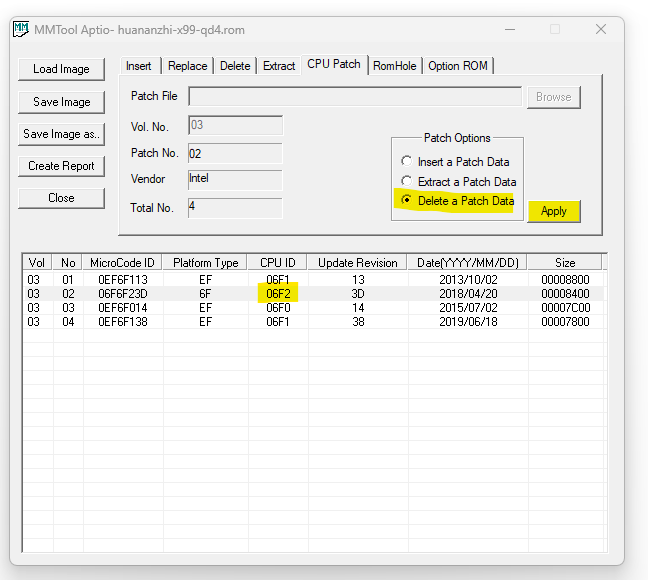
[Cpu Patch]tab. - Find and delete all entries from the table where
CPU IDequals to06F2. - Save the modified BIOS.
Set CPU C State options
- Launch the
AMIBCP5.exeapplication. - Open the BIOS file saved in the previous step.
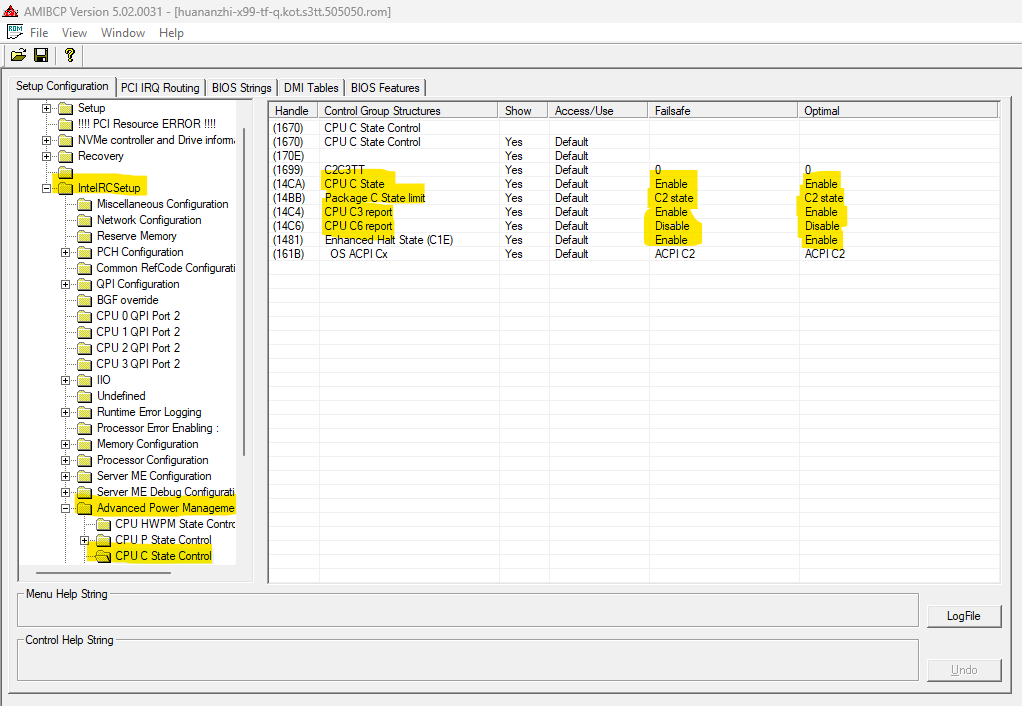
- In the left tree find the
CPU C State Controloption, usually it’s located at the following path:Common RefCode Configuration→IntelRCSetup→Advanced Power Management Configuration→CPU C State Control. - Set the following values:
Package C State limittoC2 state.CPU C3 reporttoEnable.CPU C6 reporttoDisable.
- Close AMIBCP5 application and agree to save changes.
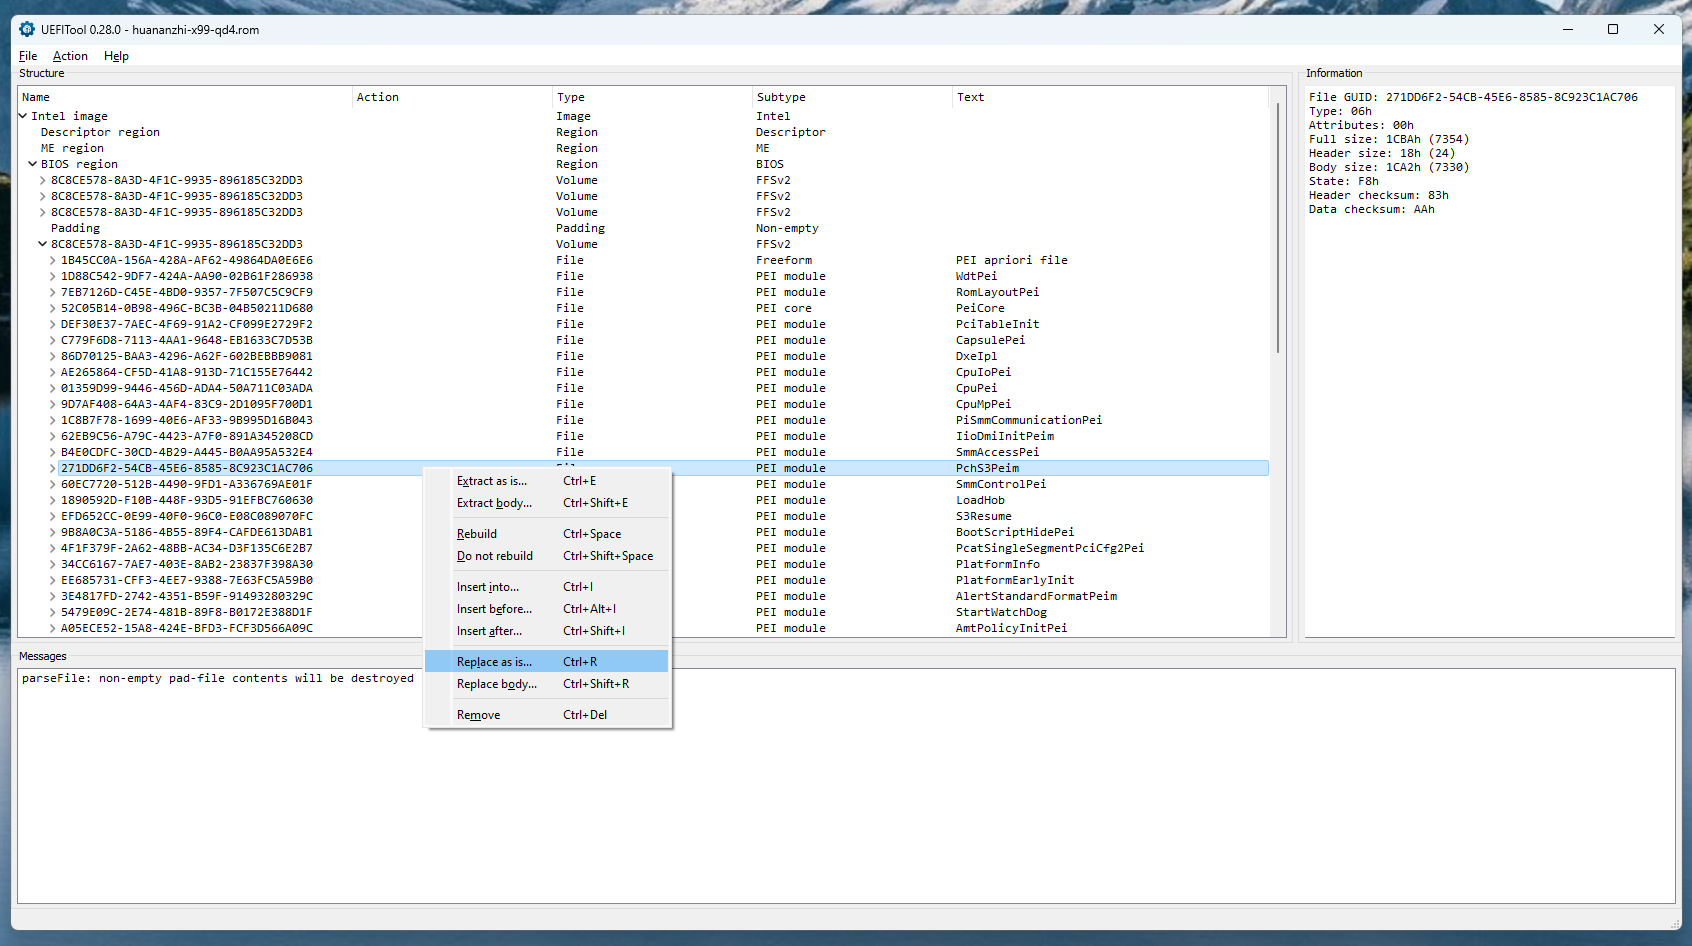
Inject required TBU driver - Single Socket
- Launch the
UEFITool.exeapplication. - Open the BIOS file saved in the previous step.
- Inside
Intel image→BIOS regionsearch for entryPchS3Peimwith UID271DD6F2-54CB-45E6-8585-8C923C1AC706. - Right-click on the
PchS3Peimentry and select[Replace as is ...]. - Select the desired
.ffsfile you want to inject. - Save the changes.
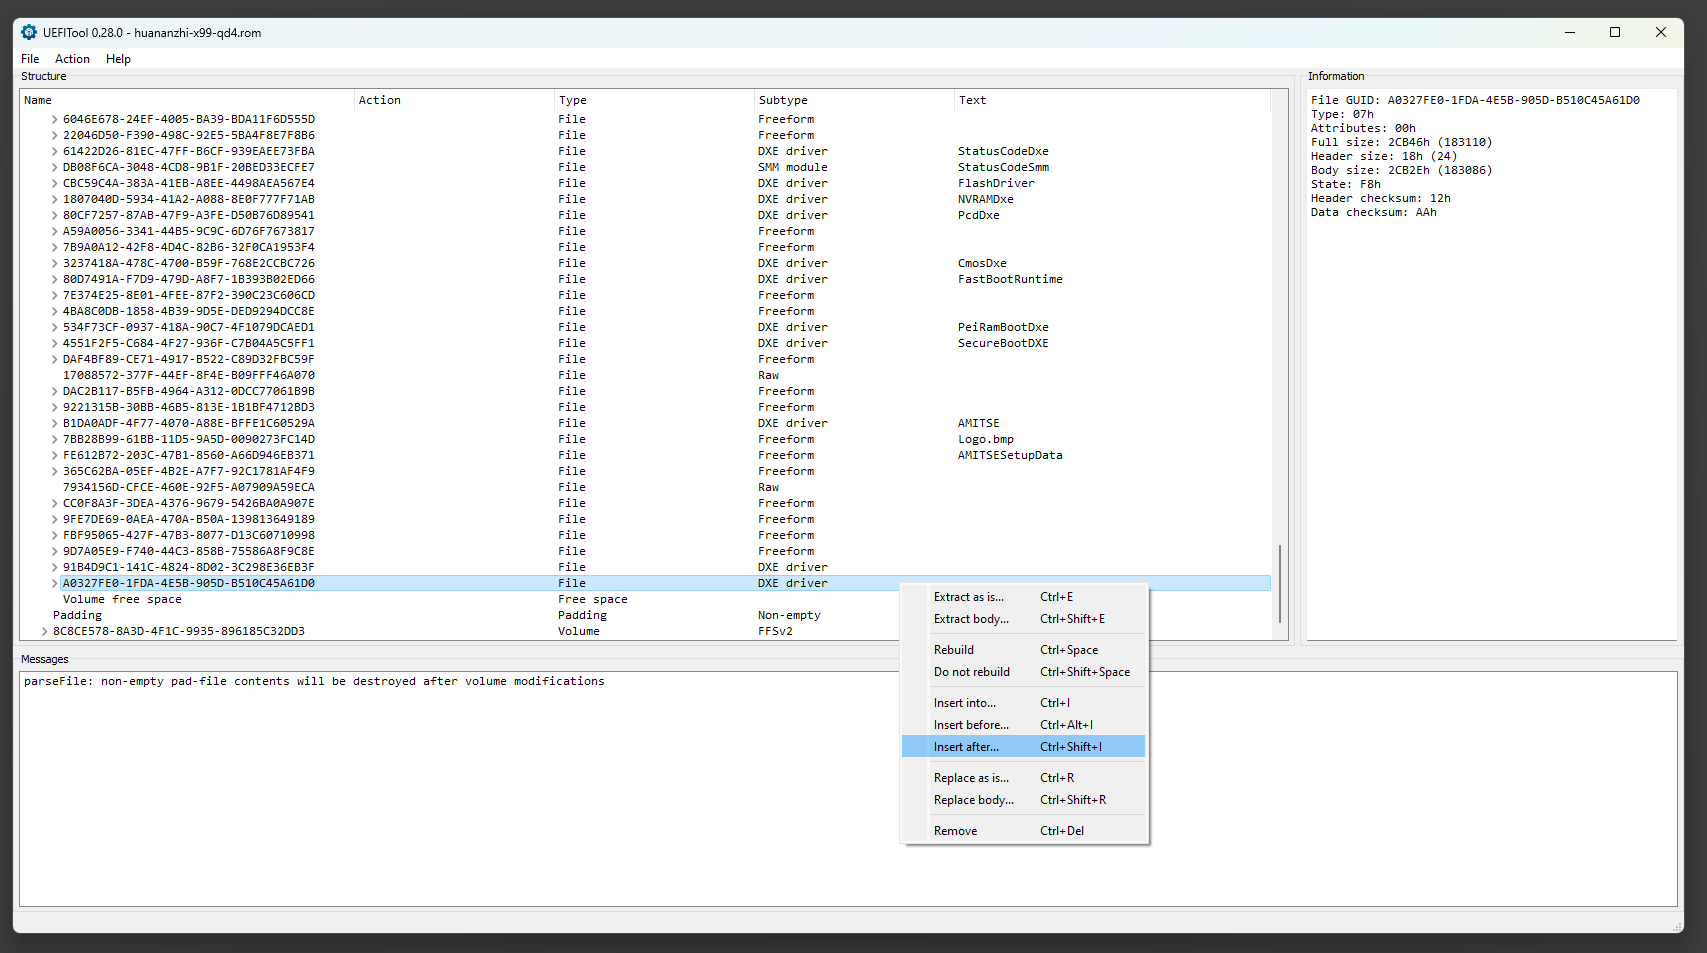
Inject required TBU driver - Dual Socket
- Launch the
UEFITool.exeapplication. - Open the BIOS file saved in the previous step.
- Inside
Intel image→BIOS regionsearch for the pre-last entryFFSv2with UID8C8CE578-8A3D-4F1C-9935-896185C32DD3. - Inside find the last DXE entry, in my case it case UID
A0327FE0-1FDA-4E5B-905D-B510C45A61D0. - Right-click on it and select
[Insert after ...]. - Select the desired
.ffsfile you want to inject. - Save the changes.

Flash the BIOS
- Flash the BIOS, see how below.
- Reboot and go into BIOS settings.
- Restore BIOS defaults.
- Save changes and reboot.
- Go into BIOS again if you want to adjust extra settings.
To flash the modded BIOS you have the following options:
- Mi899 if you trust my app and don’t want to bother with console (command line) yourself.
- FPT and AFU applications, see the syntax below.
-
External flash programmer if the BIOS is locked for software flash: [🇬🇧 CH341a – minimal usage guide how to read & write a motherboard BIOS](https://youtu.be/4qX2zihB6UE?si=vXVf4Fo430RfLJ05).
Extra notes:
- The
.romand.binfile extensions do not matter as long as you have a binary BIOS file. - Make sure to buy a programmer with a voltage switch, like this one: CH341A Programmer V1.7 1.8V - 5.0V.
FPT syntax
To save / dump the current BIOS execute the following:
fptw64.exe -d bios-file-name.bin
To flash BIOS from a file execute the following:
fptw64.exe -f bios-file-name.bin
Make sure to run console (CMD) as administrator and replace bios-file-name.bin with the actual file name.
AFU syntax
To save / dump the current BIOS execute the following:
Important: AFU saves only half of the BIOS (8MB) instead of the full BIOS (16MB). Such dump can be flashed with AFU, but not with FPT.
AFUWINx64.exe bios-file-name.bin /O
To flash BIOS from a file execute the following:
AFUWINx64.exe bios-file-name.bin /P /B /N /X
The UEFI system does not boot after TBU
This is a known UEFI bug of the LGA 2011-3 X99 platform. The fix is simple:
- Shut down the computer.
- Disconnect the power cord.
- Disconnect all storage devices.
- Turn on the computer.
- Go to the BIOS and restore defaults.
- Save changes and restart.
- Go to the BIOS and apply any extra settings you wish, such as RAM timings. This is an optional step.
- Turn off the computer and disconnect the power cord.
- Connect all storage devices back.
- Turn on the computer, it should work properly.
Extra links
- Xeon E5-2600 V3 Turbo Boost Unlock.
- 🇬🇧 CH341a – minimal usage guide, how to read & write a motherboard BIOS.
- 🇬🇧 Mi899 – X99 Tool Set, read, write BIOS & unlock turbo-boost with a few mouse clicks.
- 🇬🇧 Resizable BAR on LGA 2011-3 X99 – how to enable and get extra performance.
- GitHub: Mi899.
- GitHub: ReBarUEFI.
- GitHub: UEFITool.
- Join my Discord to ask questions.